What is gear Terminology?
Gear Terminology
The terms used in connection with the measurement of gears are defined as follows.
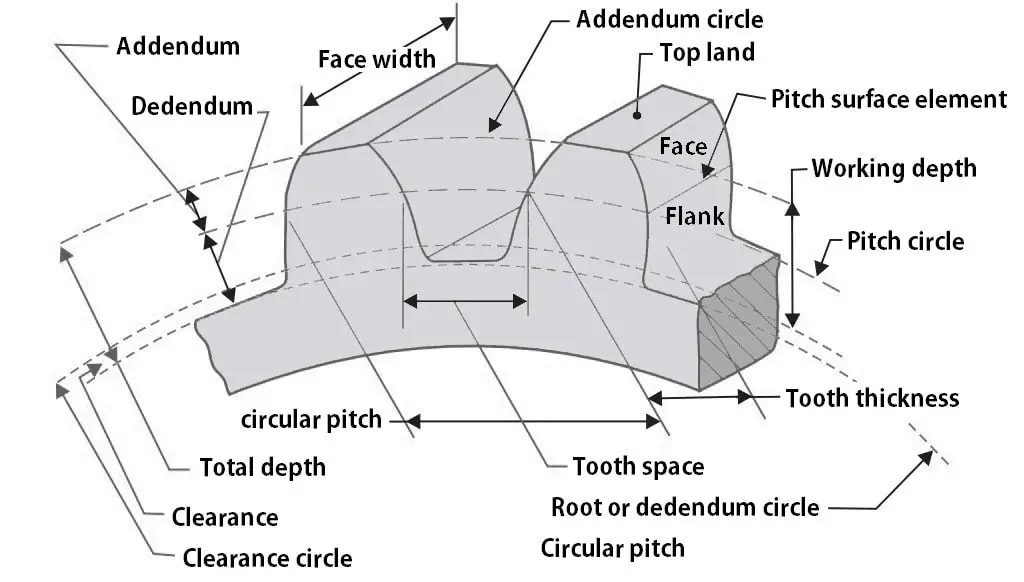
Addendum Circle.
The circle which limits the top of the gear teeth and represents its maximum diameter is called addendum circle.
Addendum.
It is the radial height of the tool from the pitch circle to the tip of the tooth.
Dedendum.
It is the radial depth of tooth from the pitch circle to the root of the tooth.
Clearance.
The radial distance from the top of the tooth to the bottom of the tooth space in the mating gears is called as clearance.
Face of tooth.
It is the side surface of the tooth above the pitch circle, perpendicular to the plane of the gear.
Flank of tooth.
It is the side surface of the tooth below the pitch circle, to the plane of the gear.
Tooth thickness.
It is the of the tooth, measured along the pitch circle.
Whole depth.
It is the sum of the addendum and dedendum of a tooth. Working depth. It is the greatest depth to which a tooth of one gear extends into the tooth space of a mating gear.
Working depth = Addendum + Dedendum — Clearance
Dedendum Circle.
It is the circle which contains the bottoms of the tooth It is also called a root circle. Its diameter is the root diameter.
Pitch Circle.
In every pair of gears in mesh, the two circles representing the two plain wheels in contact are always assumed to Each Of these circles is called a pitch circle. Its diameter is the pitch circle diameter.
 |
| Image by Extrudesign via https://extrudesign.com/wp-content/uploads/2019/08/Gear-Terminology-extrudesign.com-002-1024x582.jpg |
Pitch point.
It is the point of between the pitch circles of two gears in mesh.
Crest of tooth. It is the outside surface of the tooth, perpendicular to the plane of the gear.
Root of the tooth.
It is the junction of the tooth with the material at the bottom of the tooth space.
Base Circle.
It occurs only in involute gears and is the circle from which the involute curve of the tooth profile is generated.
Circular Pitch.
It is the distance measured along the pitch circle, from a point on one tooth to a corresponding point on the adjacent tooth.
For a spur gear, Circular pitch, Pc=(π ×d)/T
where,
d = pitch circle diameter
T = number of teeth and
m = module .
Diametral Pitch.
It is the number of teeth per unit length of the pitch circle diameter
Diametral Pitch=(Number of teeth) T/ (Pitch circle diameter) d
Module
It is the linear distance in mm that each tooth of the gear would occupy, if the gear teeth were spaced along the pitch diameter.
Module = (Pitch circle diameter) d / (Number of teeth) T
Thus, it is the reciprocal of Diametral pitch,
Pressure angle or angle of obliquity
It is the angle which the common normal to the two teeth at the point of contact makes with the common tangent to the two pitch circles at the pitch point.
The standard proportions adopted by the Indian Standard Systems of the elements of an involute spur gear are given in table below
|
Name of tooth element |
Symbol |
Gear tooth proportions (pressure angle 20o) |
|
|
|
|
|
Pitch diameter |
d |
2 m |
|
Addendum |
ha |
m |
|
Dedendum |
hf |
1,25 m |
|
Working depth |
2 ha |
2 m |
|
Tooth depth |
h |
2.25 m |
|
Outside diameter |
d' +2 ha |
m(2 + 2) |
|
Tooth thickness |
s |
1.5708 m |
|
Radius of fillet |
r |
0.4 no to 005 cc |
|
Clearance |
hf-ha |
0.25 m |
The recommended series of modules adopted by the Indian Standard System are 1, 1.25, 1.5, 2, 2.5, 3, 4, 5, 6, 8, 10, 12, 16 and 20. The modules 1.125, 1.375, 1.75, 2.25, 3.5, 4.5, 5.5, 7, 9, 11, 14 and 18 are of second choice.
The recommended series of Diametral pitches are 20, 16, 12, 10, 8, 7,6, 5, 4, 3, 2 1/2, 2, 1 1/2,1 1/4 and 1.
Reference - A textbook of METROLOGY by M. Mahajan
Conclusion
A full article on What is gear Terminology? Thank you very much for reading full article. We have tried to provide as much info as possible, we hope you like the above information. If you have any questions or suggestions you can write it down in the comment box or mail us at Mail id given below.
info.mechtrekk@gmail.com


0 comments: